Application overview
- Introduction
- Main menu
- Map display options
- Vehicle management panel
- Alarm and Geofence panel
- Vehicle and Track panels
VehicleTracker introduction
Welcome to the VehicleTracker Application!
VehicleTracker is a web based application for real time vehicle tracking and fleet status management. You can view your fleet, manage and create reports with a standard web browser. You can also get notifications over email and SMS for all events in the application. You can view your vehicles and follow up on alerts in any mobile phone with a web browser. You can relax now as the system will tell you when something is wrong with your fleet.
As an Operator you can manage vehicles and work with different workspaces for different tasks. Each operator has a personal account and access rights are defined for each operator for a set of vehicles. A an Application Administrator you can also access administrative functions to configure application behavior and adjust the look-and-feel of the interface.
The VehicleTracker user interface is made up of multiple panels that can be freely moved around and re-sized. Any set of panels can be saved as a custom Workspace. There is a Default Workspace that shows a map, Vehicle list, Vehicle Info for the selected vehicle and panels with Tracks and Track points, as shown in the picture below.
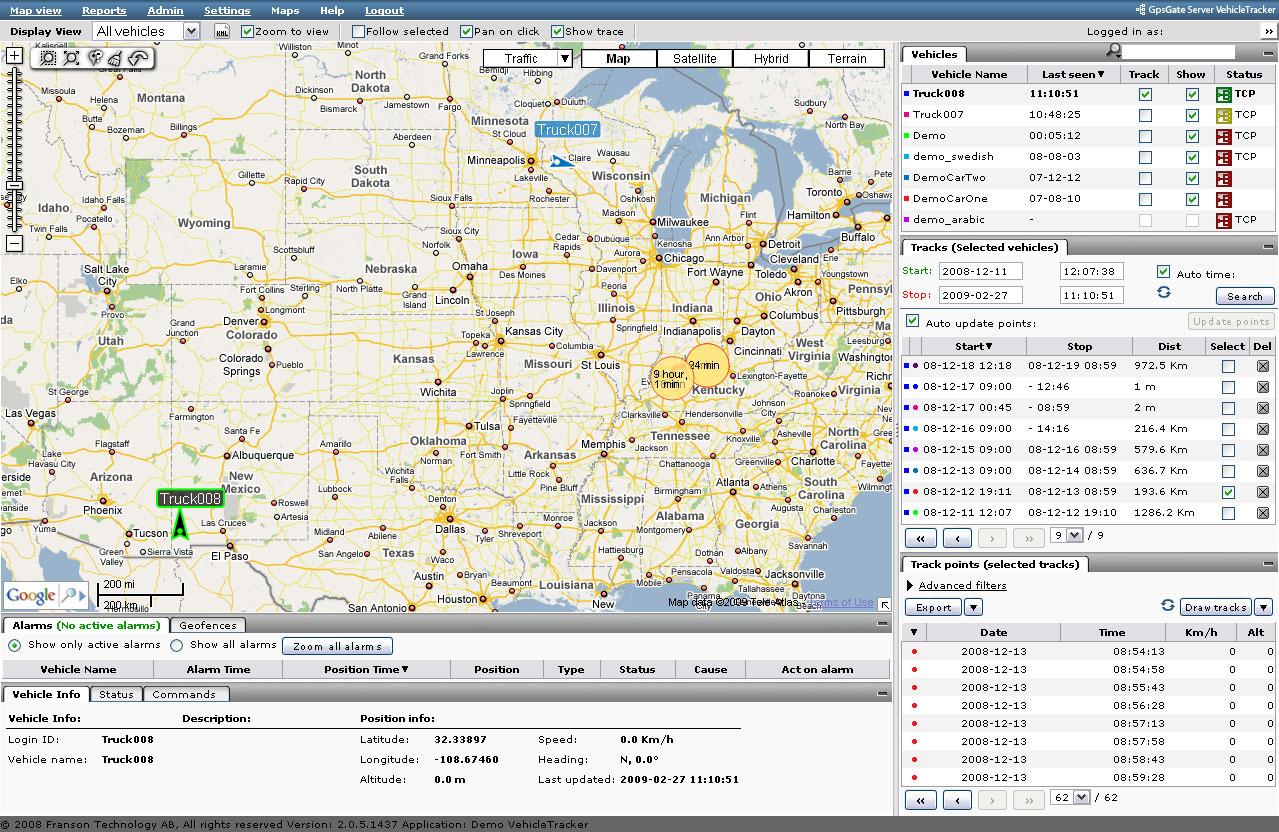
Note: Multiple Workspaces can be created where panels are moved and re-sized. Therefore your actual user interface might differ from the pictures in is manual.
This guide mainly covers user functionality in VehicleTracker. If you need any additional information, please ask your Tracking Server Site Administrator for help.
Thank you for using VehicleTracker!
Main menu
The main menu at the top of the page has the following items.
| Map view | Takes you to the main page |
| Reports | View reports and create new ones. Export vehicle data as KML or CSV files |
| Admin | Manage users and vehicles. (only available for Application Administrators) |
| Settings | Select languages, measurement settings, track filtering options, application layout and change your own password |
| Workspace | Select and manage your workspaces |
| Maps | Choose between your maps if you have installed more than one map |
| Windows | Select the plug-in windows available in your installation |
| Help | Open up a new browser window with the Help pages |
| Logout | Log out from the application |
Map Display Options
Above the map you have the following Display options:

| View | Select between your different views |
| KML | Export the content in the view as a KML-feed. Can be saved or used in ex. Google Earth |
| Zoom to view | If checked, changing View will zoom the map to show all vehicles in that view |
| Follow selected | If checked, the map will automatically center on the position of the vehicle selected in the Vehicle list |
| Pan on click | If checked, the map will center on a vehicle when you select it in the Vehicle list |
| Show trace | This option will show a short red line after the vehicle you have selected in the Vehicle list, the line represents the last 10 position updates for the vehicle |
Google Map features
| Map modes |  There are currently four different Google Map modes, Map, Satellite, Hybrid and Terrain. Note that if you are using Custom maps then you will not have these options There are currently four different Google Map modes, Map, Satellite, Hybrid and Terrain. Note that if you are using Custom maps then you will not have these options |
| Zoom control | On the left side of the map you have the zoom control bar. Drag it up or down to zoom in and out. You can also zoom in with a double left click on the map and zoom out with a double right click |
| Zoom area | Click on the  button and then hold down left mouse button and drag a square over the area you would like to zoom into button and then hold down left mouse button and drag a square over the area you would like to zoom into |
| Zoom all Vehicles | Click on the  button to zoom in on all vehicles on the map button to zoom in on all vehicles on the map |
| Request Address | Click on the  button and then drag the marker to the place you want address information for button and then drag the marker to the place you want address information for |
| Clear map | Click on the  button to clear all tracks from the map button to clear all tracks from the map |
| Undo Zoom | Click on the  button to undo the previous zoom operation button to undo the previous zoom operation |
Vehicle management panel
The Vehicle Management Panel shows information about the vehicle that is currently selected in the Vehicle list in the Vehicle Panel.
Note: You need to select a vehicle in the Vehicle list to show information about it in this panel
Vehicle info tab
The Vehicle Info tab shows information for the vehicle currently selected in the Vehicle list. It displays information such as Latitude/Longitude, speed, heading and when it was last updated.

Status tab
The Status tab shows all current information from the device for the currently selected user.

Commands tab
The Commands tab contains device control and configuration commands. The Commands tab shows the commands available for the currently selected vehicle.
Here you can start and stop tracking and send a poll-position SMS to request a position from an off-line device.

Alarm and Geofence Panel
Alarms tab
The Alarms tab shows incoming alarms from your devices. In the Alarms tab header you can see if there are active alarms. You can expand an alarm with the arrow on the left to get more information.

You can close an open alarm by clicking on the Close alarm button on the right side of the desired alarm. Click on the arrow on the left side of your alarm to get more information.
Geofence tab
The Geofence tab is used to edit and group geofences. A Geofence is a virtual boundary on a geographic area. You can create alerts when vehicles enter or exit a geofence or both.
Vehicle and Track panels
 In the default view the panels for vehicles and tracks are to the right of the map. There are three panels with the following functionality:
- Vehicle panel: Shows current vehicle status and filters information for the other panels
- Tracks panel: Lists the tracks available for further analysis and viewing
- Track Points panel: Lists the selected track points and historical status information
By default it shows the Vehicle Name, the time it was last seen, one check-box for Tracks and one for Show/Not show.
You select a User/Vehicle either by clicking on it on the map, or in the Vehicle list in the Vehicles panel. A selected User/Vehicle will be marked in green on the map and highlighted in bold in the Vehicle list.
Vehicle Panel settings
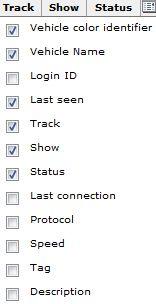 The Select Columns icon to the far right in the Vehicle list header lets you choose which columns to display in the Vehicle list. You can select from the following default fields:
- Vehicle color identifier - identifies the vehicle in the track list
- Vehicle Name - the name of the vehicle
- Login ID - the vehicle login id
- Last seen - time stamp for the last valid position update
- Track - the check-box for selecting tracks for a vehicle
- Show - the check-box for showing a vehicle
- Status - the vehicle connection status icons
- Last connection - time stamp for the last server connection
- Protocol - the protocol used by the device (HTTP, TCP, SMS,...)
- Speed - vehicle speed at last update
- Description - vehicle description
 - Connected and sending position
 - Connected but not sending position
 - Not connected
 - Never been seen
Above the Vehicle panel there is a Search-function where you can make free-text searches for your Operators/Vehicles by Login ID or Vehicle name.